In this chapter, you will learn about the cavity and the core. You will learn the types of inserts and their processing methods, position, material and different usage depending on production quantity per molding cycle.
In previous chapters, we learned that how molten plastics was injected into the mold. The mold is composed of a cavity and a core. The cavity is a concave cavity plate. The core is a convex core plate. We previously stated that molten plastics is injected into the cavity. Actually, it is injected into the space between the cavity and the core.
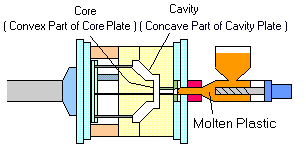
Cavity and Core
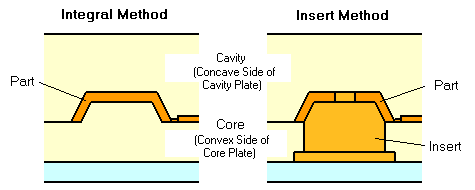
Cavity and core are categorized into integral method and insert method. The method is determined by the part quantity and the molding shape.
Integral method
The cavity and the core have the same shape as the part.
Insert method
Another part is inserted into the mold to get the final shape of the part.
Using a different material from that of the mold to improve abrasion resistance or make temperature control easier.
It is difficult to directly machine a mold when complicated shapes or multiple shapes are aligned, whereas attaching an insert as a separate part makes the process easier.
It is possible to change the material of the part that is subject to damage due to repeated molding with a special material or replace only the damaged part.
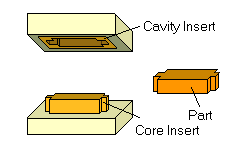
An insert attached to the cavity side is called a cavity insert. An insert that is attached to the core side is called a core insert.


The following factors determine whether an insert is used.
| Mold Condition | Molding Condition | |||
| Mold Material | Single part | Multiple part | Special shape | |
| S55C | Intergral | Core insert | Core insert, Cavity insert | |
| Special steel | Core insert, cavity insert | |||
The shape of a part determines whether an insert is attached to the cavity, the core, or both.
Also, the insert method is used to process the cavity and the core with special materials, depending on the molding material.
An Insert is categorized into the following types:
Flange insert
If the shape of the part is round, a flange insert is used. The insert does not need a baffle, so only a flange is needed to prevent an insert from lifting. A round shape is easy to process when making an insert or a mold.
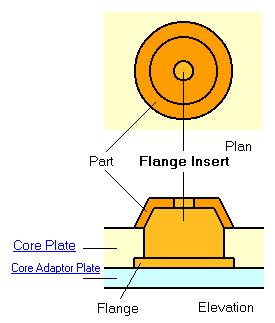
Also, a flange is attached only to the long side when using a square flange insert.
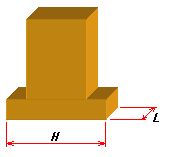 As in the figure, if H >L., attach a flange to the L direction, and if H < L, to the H direction.
Pocket Insert
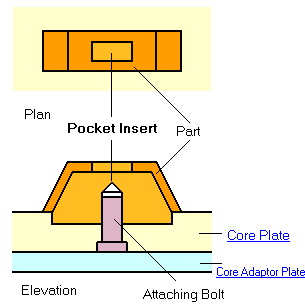
A pocket insert is generally used when the shape of the part is square. A pocket insert is attached to the mold by an attaching bolt, as shown below..
Making Inserts
When making an insert or a mold, be careful with the accuracy of measurement so that the insert and the mold can be attached without a gap. If the measurement is not accurate, an insert can not be attached to a mold, or a flash may result due to the big gap, and the part will not look good. Attach an insert and a mold by processing as follows.
For a flange insert: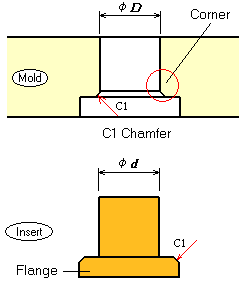 |
For a pocket insert: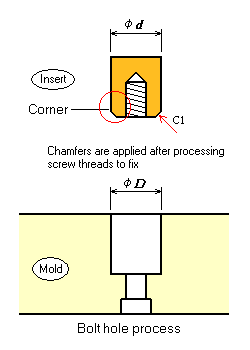 |
When making an insert or a mold, chamfers are applied to its corners. The corners can not be processed at a right angle due to the edge R of cutware or relief of cutware, even when an insert or a mold is made accurately as measured. If an insert is attached to a mold without chamfering, the corner will interfere and prevent the insert from being attached at the proper position. Also, an excessive gap between an insert and a mold will cause part defects. Therefore, be sure to fulfill the matching requirement (positional tolerance of hole and axis) that is regulated by the Japanese Industrial Standard (JIS).
The chart below shows the typical matching tolerances.
| Hole tolerance (f D ) |
Axis tolerance (f d ) |
|
| Regular Process | H7 | h6 |
| Precise Process | H6 | h5 |
In the chart above, the hole tolerance (Ø D ) refers to the tolerance of the hole size (Ø D ) of the mold in the above figure, and the axis tolerance (Ød ) refers to the tolerance of the axis size (Ø d ) of the insert in the above figure. As the matching tolerance varies depending on outer diameter of hole or axis or types of matching (gap matching, midpoint matching, or draw matching), refer to the JIS reference chart.
Position of Insert
The position of an insert is determined by part quantity or type of insert. The positions of insert are as follows:
When a flange insert is used: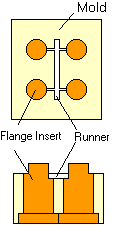 The insert is attached directly to the mold, Both the insert and the mold need to be made precisely. Installation |
When a pocket insert is used: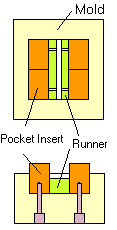 The mold is made with the measurement of an insert + a runner. Even if there is an error in the mold measurement, the mold is easily processed because a runner (made by a separate part) is used for adjustment. Installation |
When a pocket insert is used: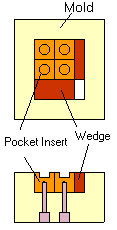 The mold can be processed easily because a wedge measurement is used to adjust, even if there is an error in a mold measurement. Installation |
Trở lại:
Bảng học khuôn mẫu


